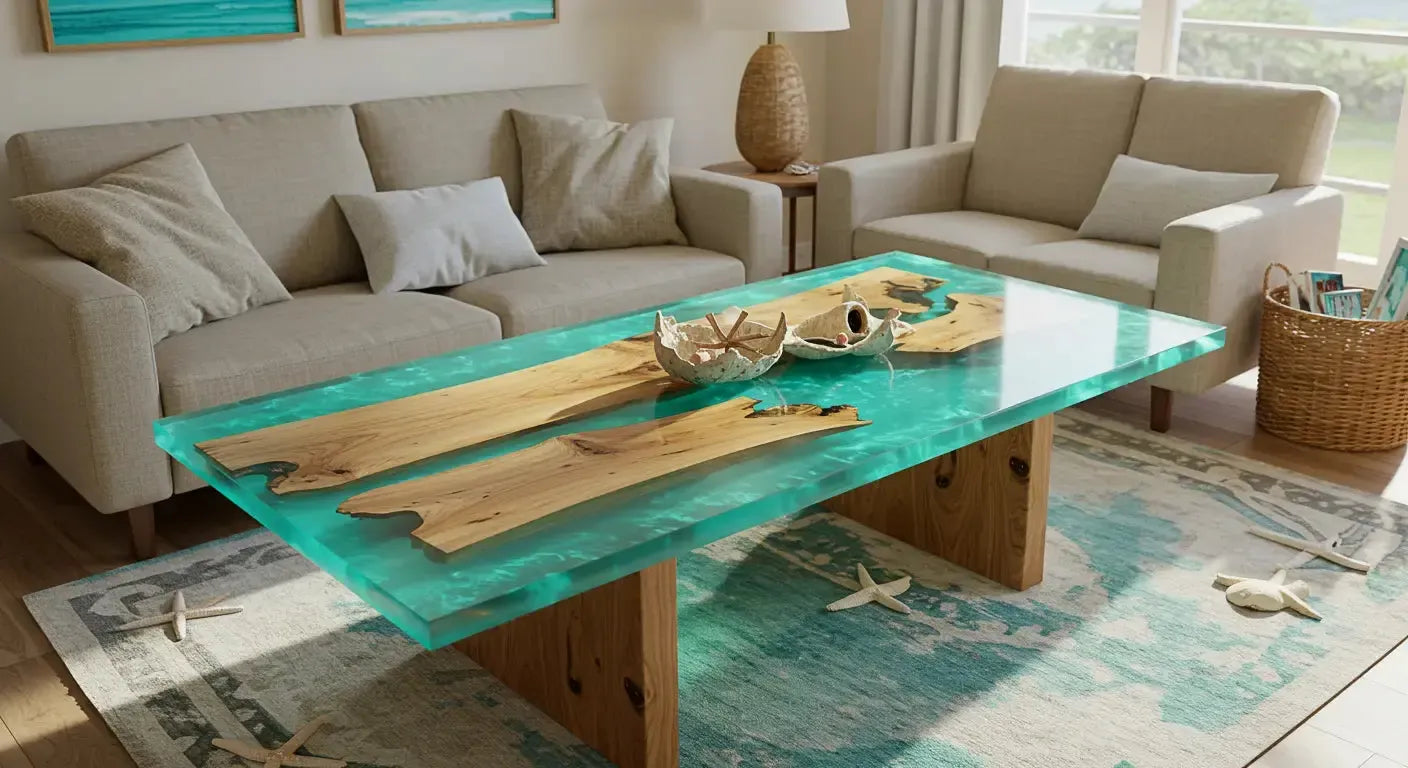
There’s something about turquoise that always stops me in my tracks. It’s not just a color — it’s a mood. Calm but alive. Bright but grounded. I’d been eyeing those blue epoxy table builds for months, but I didn’t want something generic. I wanted to make a turquoise epoxy resin table that actually felt like the ocean was pulled into the room — and sealed in forever.
The Inspiration: Capturing Coastal Serenity in Furniture
Why turquoise? The allure of ocean hues in home décor
Turquoise hits that sweet spot between tropical and tranquil. It reminds me of tidepools, wave breaks, and the way light dances off water at golden hour. I knew I didn’t just want a table — I wanted a feeling.
Envisioning a piece that brings beach vibes to my living space
I didn’t live near the coast, but I wanted that vibe year-round. So this teal epoxy table design became a mission to bring the coast indoors — no seashells required. I explored a few options, but none came close to the creative freedom I found in epoxy river tables.

Selecting the Perfect Wood: Marrying Nature with Resin
Choosing a live-edge slab to complement the turquoise epoxy
I went with a wide, live-edge walnut slab. The richness of the grain made the turquoise pop even more. I tested maple too, but it didn’t give me the contrast I wanted. For this build, walnut was the move. If you’re curious about slab prep, I break it down in my wood selection & prep guide.
Preparing the wood: sanding, sealing, and setting the stage
Once I had the slab picked, I sanded it down to 120 grit and sealed the edges with a thin layer of resin to prevent bubbles. I’ve learned the hard way — skipping that step can ruin an otherwise perfect pour.

Mixing the Magic: Crafting the Turquoise Epoxy Blend
Experimenting with pigments to achieve the ideal shade
Turquoise isn’t just one color. I mixed a little transparent blue, pearl white, and a touch of green pigment to get a hue that felt layered — like depth in water. I did a few test pours first. Highly recommend.
Tips for a bubble-free, crystal-clear finish
I warmed the resin bottles slightly before mixing, used a slow stir to avoid whipping air in, and poured in stages. Torch passes were quick and light. Too much heat and you’ll get micro-cracks or discoloration. For more finishing tips, check out how I polished my table to a mirror-like finish.

The Pour: Bringing the Vision to Life
Setting up the mold and securing the wood slab
The mold was built from melamine, sealed with silicone, and lined with Tyvek tape. I clamped the slab securely in place and made sure everything was perfectly level — this pour was too pretty to risk a slope.
Pouring the epoxy: techniques for a smooth, even surface
I poured in two layers: one to lock in the wood and another to bring the river flush with the top. A slow pour kept the pigment swirling naturally. I didn’t overwork it — the resin knows how to settle if you let it.

Finishing Touches: Sanding, Polishing, and Sealing
Achieving a glass-like finish through meticulous sanding
I started at 120 grit and worked my way up to 1000 before switching to polishing pads. Water sanding helped keep the heat down and preserve clarity.
Applying a protective seal to enhance durability and shine
For the final finish, I used a clear, UV-stable topcoat that added a bit of gloss and gave the turquoise more pop. I’ve found satin finishes mute the color — this one needed to shine. If you’re choosing between finish types, here’s my breakdown of epoxy vs polyurethane.

Reflections: Lessons Learned and Future Projects
What worked well and what I'd do differently next time
The pigment mix nailed it. The finish? One of my best yet. If I were to tweak anything, I’d try embedding stones or driftwood along the edges for more texture. This was a design-focused build — but if you’re new to epoxy tables, this beginner FAQ page might help too.
Ideas for incorporating other colors and materials
Now I’m thinking: turquoise and copper flakes? Teal resin with frosted glass inlay? Once you pull off one turquoise table, the design ideas don’t stop — and neither does the obsession with ocean tones. I go deeper into that in my post on ocean resin tables.
If you want a custom piece or hit a wall building your own, feel free to drop a comment or reach out—happy to help. Have a blessed day!


Share: