I’ve poured ocean blues, moody blacks, even glowing neon resin—but nothing felt as intense as red. It wasn’t subtle. It wasn’t safe. But that’s exactly why I wanted to try it. What started as a wild idea turned into one of my most striking builds to date: a red epoxy table that grabs attention before you even realize you’re looking at it.
Why I Chose Red: A Color That Commands Attention
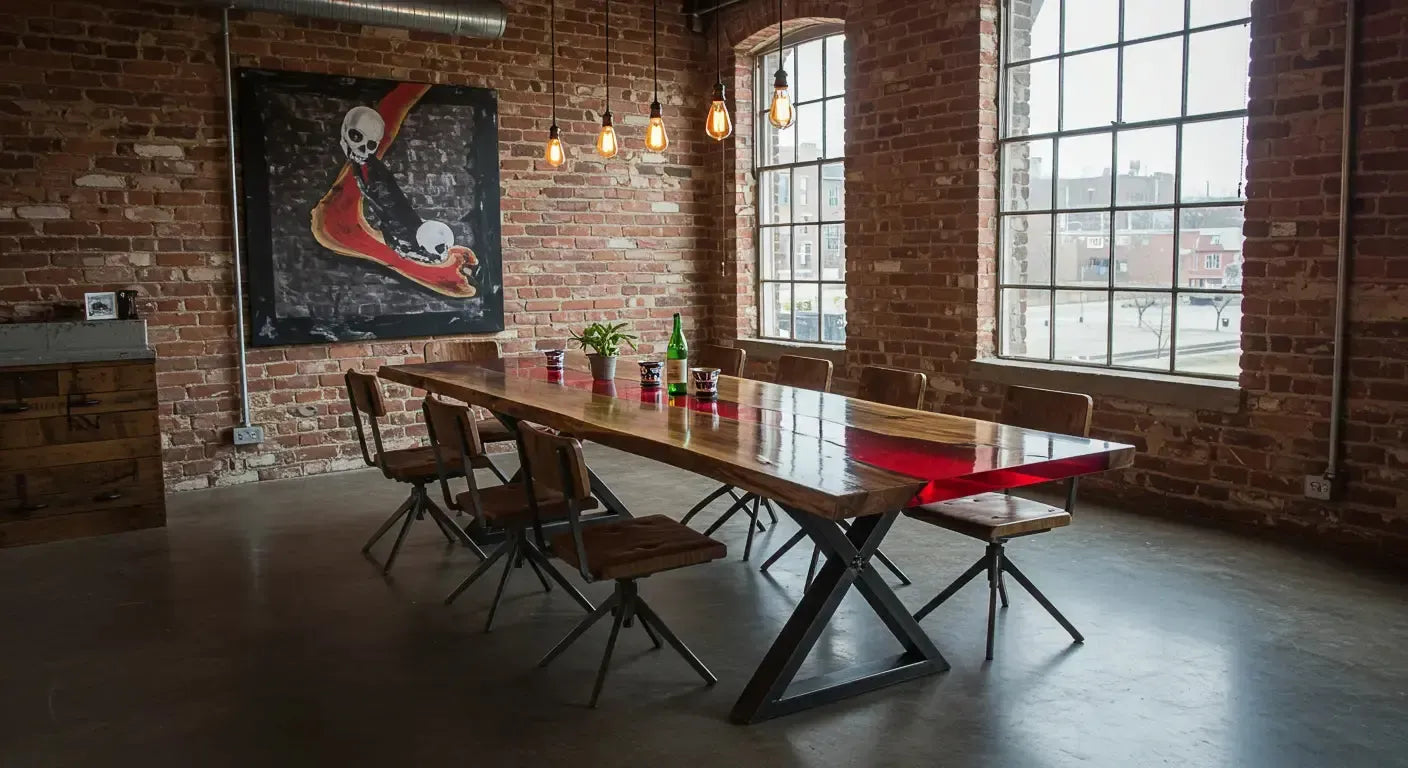
Inspired by the rich hues of red cedar and the desire to create a statement piece, I embarked on crafting a red epoxy table that would stand out in any room.
There’s something about red that instantly shifts the vibe. It’s bold. It’s emotional. It doesn’t sit quietly in the corner—it owns the space. I wasn’t sure if it would feel elegant or over-the-top, but I knew I wanted to try.

Selecting the Right Wood and Resin: Lessons Learned
Opting for walnut slabs provided a dark, contrasting backdrop that complemented the vibrant red epoxy. The choice of resin was crucial to ensure clarity and depth in the final piece.
I knew from the start that the wood couldn’t fight with the red—it had to frame it. Black walnut became the obvious choice: dark, rich, and a perfect contrast for a crimson epoxy resin table. For the resin, I used a deep pour formula with high UV resistance. I also tested a few pigments until I landed on one that felt like liquid ruby. Not orange. Not pink. Just… red.

The Pour Process: Challenges and Triumphs
Achieving the perfect red hue required experimenting with various pigments and understanding how they interact with light and the wood's natural tones.
Red is one of those colors that can shift based on the lighting, the pigment type, even the angle you’re standing at. I had to balance transparency and saturation—too much pigment and it turns muddy, too little and it fades.
Managing the pour to prevent air bubbles and ensure even distribution was a learning curve that taught me the importance of patience and precision.
Any trapped bubble would show up like a flaw in stained glass. I poured slow, torched in layers, and kept the shop temp steady. This wasn’t a pour I could afford to rush.

Finishing Touches: Bringing the Table to Life
Sanding and polishing the table revealed the mesmerizing depth of the red epoxy, making the river effect truly come alive.
Once I started sanding, I realized just how much depth that bright red epoxy table had. It didn’t look flat—it shimmered. Almost like the color was suspended in glass. I go deeper into that process in this polishing blog.
Applying a protective finish not only enhanced the table's shine but also ensured its durability for everyday use.
I finished it with a hardwax oil on the wood and a final polish on the epoxy. The contrast between the matte wood and glossy red resin made it feel sculptural—like furniture-meets-art.

Reflecting on the Journey: What This Project Taught Me
This red epoxy table wasn't just a furniture piece; it was a testament to the power of bold choices and the beauty of combining natural elements with vibrant colors.
I used to shy away from loud colors in resin. Not anymore. This red resin table taught me that color can carry emotion—just as much as shape or grain or finish. Would I make another one? In a heartbeat. Only next time, I might go even deeper. Crimson, scarlet, cherry—each one tells a different story. If you’re curious what else I’ve built with red tones, check out the Northern Cardinal collection.

Thanks for taking the time to read—I really appreciate it. I hope something in my process (or my mistakes) helps you along the way. If you want a custom piece or hit a wall building your own, feel free to drop a comment or reach out—happy to help. Have a blessed day!


Share: