It started with a box of dried flowers I forgot I had. I’d pressed them months ago—wildflowers from a hike, petals from a market bouquet, even a few sprigs from a wedding arrangement. They’d faded slightly, but still held that soft, papery beauty.
I didn’t really have a plan. But I had a walnut slab, a clear deep-pour epoxy kit, and a gut feeling that this could work. So I set out to do something I hadn’t seen done well at table scale: **embed pressed flowers in a full-sized epoxy table.**
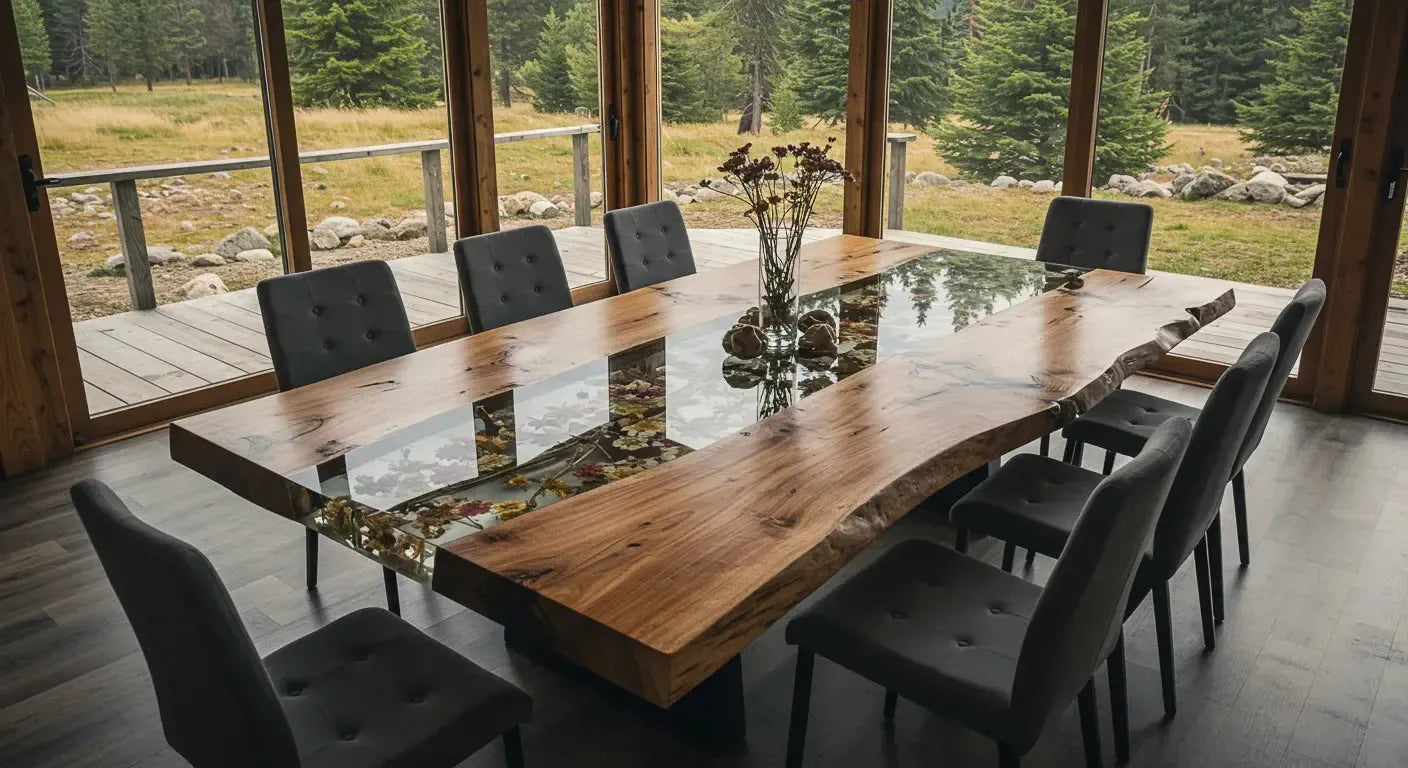
Picking the Flowers (And Figuring Out What Wouldn’t Rot)
I knew better than to use fresh flowers—I've read the horror stories about moisture bubbling or flowers turning brown inside resin. So I stuck to petals I had already air-dried and pressed flat. Mostly cosmos, daisies, and some fern sprigs that survived surprisingly well.
For anyone curious, I skipped silica gel and went old-school: books, parchment paper, and a few weeks of patience. They came out thin, textured, and fragile—but not crumbly.

Layout Was Harder Than I Thought
Arranging flowers in a small mold is one thing. Laying them out across a full table surface? Totally different game. I wanted something balanced but not symmetrical. Natural, but intentional. I mocked up the design on wax paper before the pour. Took me three hours and two espresso shots to call it “done.”
The First Pour: Locking in the Base
I poured a thin base layer—just enough to suspend the petals without floating them. Let it partially cure. This gave the flowers something to “stick” to so they wouldn’t drift or trap air. It’s a trick I picked up from working on my dried flower test build.
Placement (Tweezers + Anxiety)
I used tweezers and a toothpick to gently press each flower into the semi-cured resin. Some curled at the edges. Others cracked. But the imperfections made it feel more real—less like a manufactured product and more like a preserved moment.

The Final Pour: Deep Resin, Full Clarity
Once everything was in place, I did the main pour using a high-clarity deep-pour resin. I kept the shop around 72°F to avoid cloudiness and used a heat gun to chase bubbles. This part was stressful—the pour was thick, and any trapped air could ruin the whole thing.
I let it cure for 72 hours before even touching it.
The Sanding + Topcoat (Where the Magic Happened)
The sanding process brought the clarity forward. I wet sanded up to 1000 grit and finished with a high-gloss topcoat. That’s when the flowers really came alive. The transparency, the soft shadows, the little bits of texture—everything looked suspended in time.
What Surprised Me Most
- Some of the petals kept their color better than expected (especially yellow and white tones).
- Imperfections looked intentional. One cracked flower became the most talked-about feature.
- The flower table sold faster than any other build I had in my studio that month.

Want to Try Floral Resin Projects?
If you’re not ready to jump into a full table, here are a few smaller flower-in-resin projects I tried when I was starting out:
- Beginner resin crafts that actually turned out okay
- Flower keychains that helped pay my rent
- Tips that saved my first floral pours
This flower table now lives in a sunlit reading nook. Every time I walk past it, it feels like a season frozen in resin—and that’s something no photo can really capture.
— Solomon
Founder, The Resin Society
Started with small resin tables in my apartment — now building a global community of artists, collectors, and custom design lovers. resinsociety.net


Share: