It started with a walk in the woods and a pocket full of pine cones. I wasn’t planning to build anything with them. I just liked the texture. But that small collection turned into one of the most meaningful builds I’ve ever done—a pine cone epoxy table that now lives in my studio as a quiet reminder of how wild ideas sometimes work out better than the planned ones.
The Spark: Why Pine Cones Captivated Me
A Walk in the Woods: Gathering Inspiration
I picked them up without a plan—just something tactile to hold while I was clearing my head. But when I got back to the shop and saw them sitting next to a spare walnut slab, something clicked.
Seeing Potential in Nature's Overlooked Elements
Pine cones aren’t perfect. They’re flaky, uneven, and kind of messy. But up close? The structure is incredible. I couldn’t stop thinking about how cool they’d look suspended in resin. That’s when the nature epoxy table idea took hold.

Conceptualizing the Design
Visualizing the Fusion of Wood, Resin, and Pine Cones
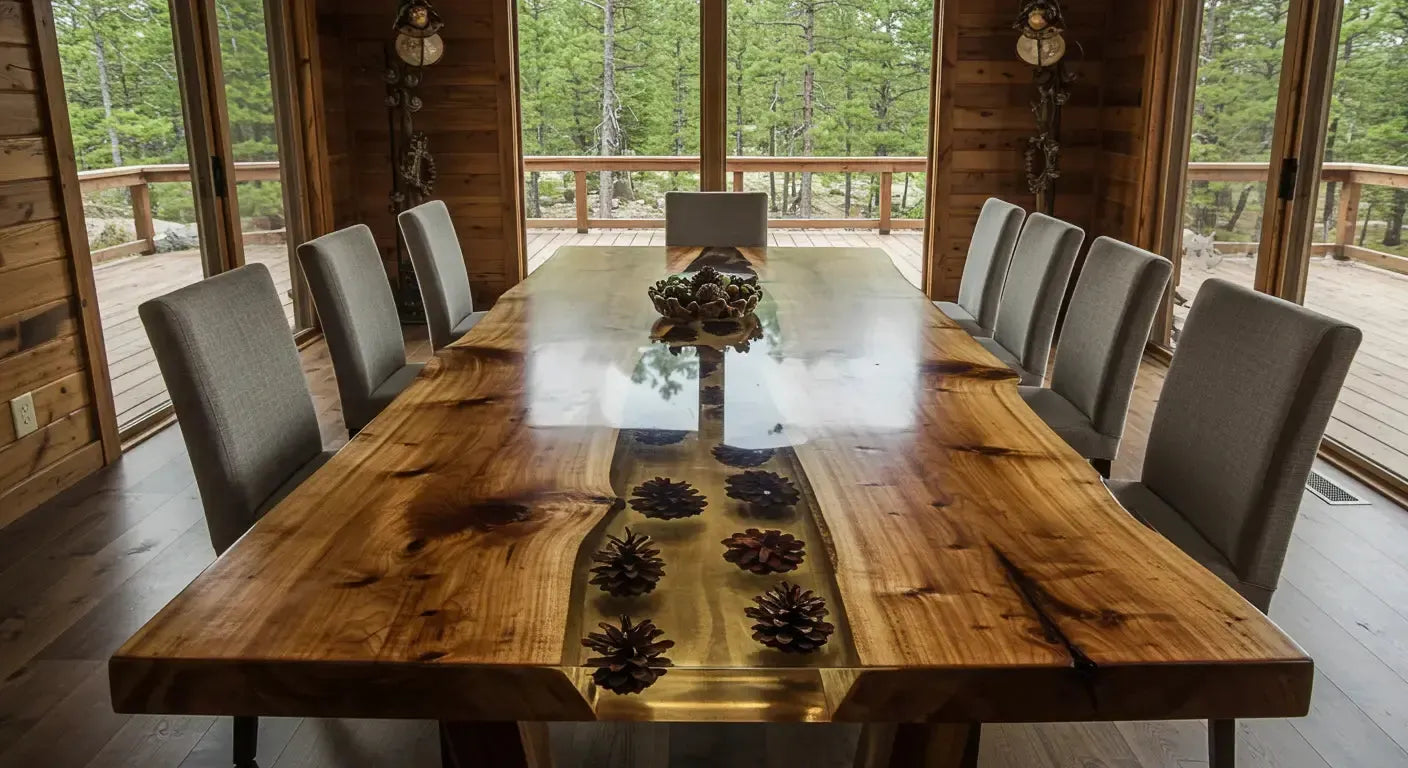
I wanted the table to feel like a forest floor frozen in glass—wood grain, scattered cones, maybe even some bark or moss details. Something natural but elevated.
Sketches, Mood Boards, and Late-Night Brainstorms
I went through a few versions. Full resin slab? Too much. Just inlays? Not enough. Eventually, I sketched out a center channel pour—pine cones suspended in a river-style layout, framed by live edge walnut.

Selecting the Right Materials
Choosing the Perfect Slab of Wood
I went with a piece of black walnut that had just enough curve to feel organic. The color contrast against the pine cones would give the resin some serious pop.
Sorting Through Pine Cones: Size, Shape, and Texture
Not all pine cones work. I tossed the flaky ones and kept the ones that were tightly layered, symmetrical, and clean. A few had cool imperfections—those became focal points. Just make sure your pines cones have no moisture. Faux pine cones are also a great alternative and will typically last longer.
Picking the Resin That Brought It All Together
I used a deep-pour, UV-resistant resin with a slight amber tint. I wanted a warm, forest-sunset vibe, not a crystal-clear look.

The Creative Process Unfolds
Arranging Pine Cones: A Test of Patience and Precision
Laying them out in the mold felt like composing a tiny sculpture. I wanted randomness—but with intention. Some cones were partially buried, others stood upright. Each one had a place.
Pouring the Resin: Moments of Anticipation and Surprise
The first layer locked the cones in place. The second brought them to life. Watching the resin settle around each cone was unexpectedly satisfying.
Watching the Transformation: From Raw Materials to Art
There’s nothing like waking up the morning after a pour and seeing that glassy surface. The cones looked like they were floating midair, frozen in time.

Challenges Faced and Lessons Learned
Dealing with Unexpected Air Bubbles
The cones held a lot of hidden air. I had to torch between layers, slow the pour, and even poke a few with a needle. Lesson: natural elements trap more bubbles than you’d think.
Adjusting Techniques on the Fly
I added a seal coat to the cones mid-build when I saw bubbles creeping up the scales. It helped a ton. Next time, I’d seal them before even setting the mold.
Embracing Imperfections as Part of the Story
One cone cracked during curing. I almost yanked it out, but it looked… real. Honest. It stayed. And now it’s the first thing people ask about when they see the piece.

The Final Reveal
Seeing the Finished Table for the First Time
That moment when the mold comes off and the finish hits? Pure magic. The pine cone epoxy table looked like a landscape sealed in glass.
Sharing the Piece with Friends and Family
They loved it—not because it was flawless, but because it felt like something familiar. A memory. A walk in the woods turned into furniture.
Reflecting on the Journey and the Outcome
Of all the builds I’ve done, this one feels the most “me.” There’s something about combining wild materials with precise resin work that just hits different.

Thoughts for Fellow Creatives
Encouragement for Trying Unconventional Materials
If you’re stuck in a creative rut, go outside. Pick something up. Try building around it. I never planned to make a pinecone resin table design—but it pushed me creatively in all the right ways.
The Joy of Letting Nature Inspire Art
You don’t need the most exotic slab or pigment on the market. Sometimes, the most overlooked materials make the most powerful impact.
Embracing the Process Over Perfection
Resin isn’t perfect. Nature isn’t perfect. But if you let go of the need for perfection and lean into the process, you’ll make something that feels real.
If you want a custom piece or hit a wall building your own, feel free to drop a comment or reach out—happy to help. Have a blessed day!


Share: