Let me say this upfront: cutting boards and resin don’t always get along.
I’ve made dozens of resin cutting boards over the past few years—some for gifts, some for customers, and a few just to see if a wild idea could hold up to daily use. Some turned out stunning. Some... warped, cracked, or went straight into the “never again” bin.
Here’s everything I learned the hard way about making resin cutting boards—what worked, what failed, and what I’ll never try again.
✅ What Actually Worked (And Still Looks Great)
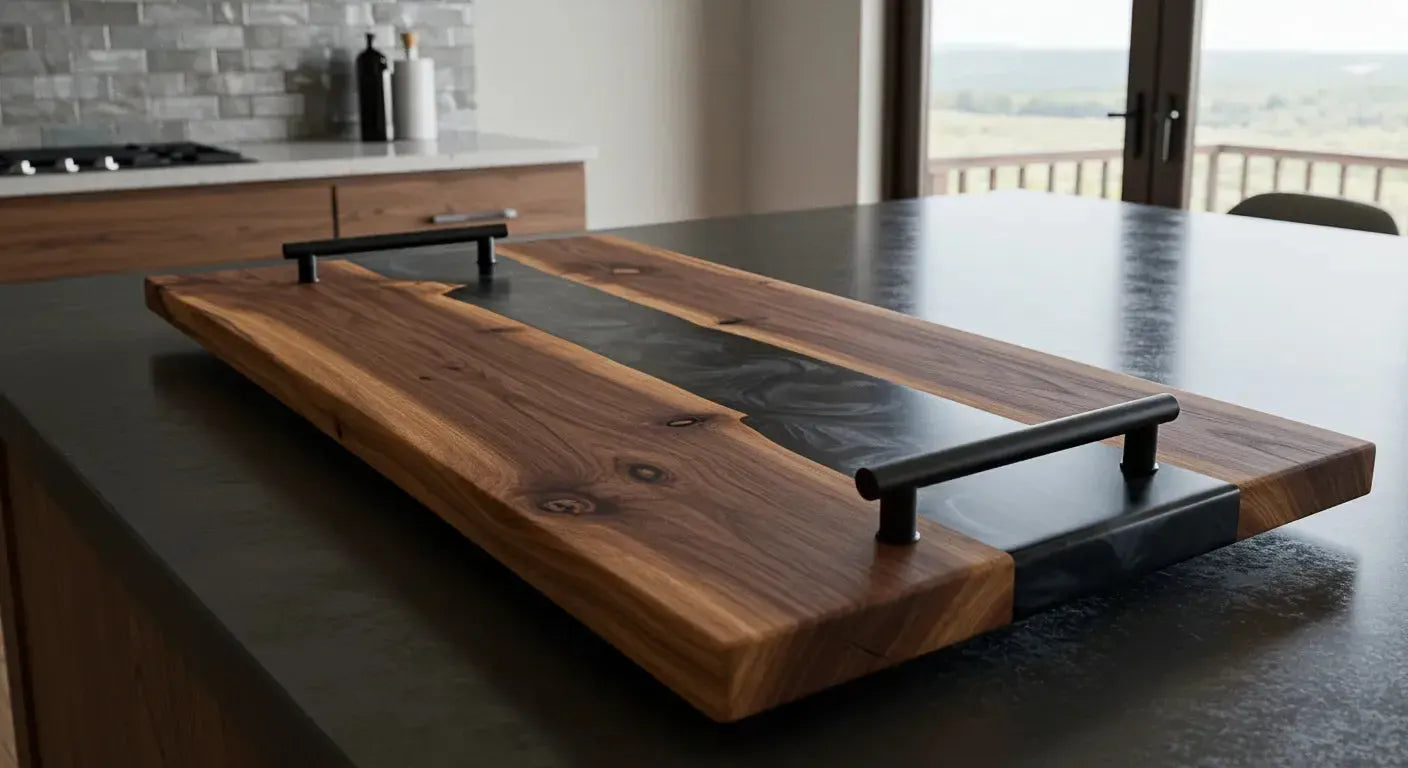
1. Partial Resin Designs—Not Full Resin Surfaces
Boards that only had resin on the handle, corners, or a small decorative stripe are still going strong. These are mostly walnut or maple boards with a river of color, some crushed shells, or metallic swirls—finished with a food-safe oil. No lifting. No warping. Just functional and beautiful.
They looked like art but could still be used as actual cutting surfaces—without making people nervous about slicing cheese on epoxy.
2. Using Deep Pour Resin for Decorative Inlays
Anytime I filled carved grooves, logo recesses, or routed rivers with deep-pour resin, the results lasted. As long as the resin didn’t cover the whole board surface, it held up to gentle use and hand-washing. Bonus: it gave the board a high-end look without compromising function.
3. Finishing With Walrus Oil + Wood Wax
I sealed every board with food-safe cutting board oil and wax. This kept the wood from drying out, and prevented the resin edge from separating over time. This combo still keeps my oldest boards looking brand new.

⚠️ What Warped, Split, or Just Didn’t Work
1. Full Resin Cutting Surfaces
I made the mistake early on of pouring resin over the entire face of a cutting board. Looked glossy and flawless... for about a week. Then a customer used a hot knife and it left a mark. Next came the dull spots. Then the warp.
Resin isn’t heatproof, and full-surface coverage means the wood can’t breathe. Over time? It pulls apart. I won’t do that again.
2. Mixing Resin and Fresh Wood (Rushed Cures)
I once used wood that was still slightly damp. Big mistake. The moisture caused bubbles, hazing, and uneven curing. That board split after just two uses. Lesson learned: always let your wood fully dry and acclimate before you pour.
3. Using Non-Food-Safe Colorants on Cutting Areas
This one’s controversial, but worth saying: not all pigments are food-safe. If the resin covers an area where food will be placed or cut, make sure every additive (mica, glitter, dye) is food-contact approved. I’ve seen some DIY boards flake color over time—and that’s not something I want near snacks.

💡 Things I’d Do Differently (And You Should Too)
Let Resin Be the Accent—Not the Surface
Use resin for handles, stripes, corners, or branding—not as the part that gets the knife. It keeps your board usable, easier to maintain, and still gives you creative freedom.
Stick to Hardwood (Walnut, Maple, Cherry)
Softer woods absorb too much moisture and resin. They’re more prone to warping after a few washes. Hardwood boards stay stable—and they just look better paired with resin. I lean heavily on walnut and green resin builds like these.
Always Tape the Bottom and Seal the Edges First
For decorative pours, always tape underneath and seal the edges before your pour. This prevents leaks, bubbles, and those annoying under-cuts that make sanding a nightmare.

Frequently Asked Questions
Can I use resin on a cutting board?
Yes—but only on non-cutting areas. Think handles, edges, or decorative pours. For actual cutting zones, use food-safe oil and skip the epoxy.
Is epoxy resin safe for food?
When fully cured, yes—many brands of epoxy are food-safe for surface contact. But it’s not knife-safe or heat-proof, so use it strategically. Here’s more on resin and food safety.
How do you clean resin cutting boards?
Always hand-wash with mild soap and water. No dishwasher. No soaking. Dry immediately and reapply finish every few months. This method keeps my boards looking great.
---
Want to See Boards That Held Up Beautifully?
If you’re not into DIY, check out the finished resin boards and serving trays in my shop. Each one is made with cured resin, seasoned hardwood, and sealed by hand with food-safe oil and wax.
— Solomon
Founder, The Resin Society
Started with small resin tables in my apartment — now building a global community of artists, collectors, and custom design lovers. resinsociety.net


Share: