It started with a sketch. Then a question: What if a table looked like lava was frozen mid-eruption? I wasn’t going for subtle. I wanted bold. Heat. Motion. Something primal. That’s how this volcano epoxy table idea went from a random spark to the wildest piece I’ve ever built.
The Spark: Turning a Fiery Idea into Reality
Inspiration struck from nature’s raw power
I’d been binge-watching volcanic footage — glowing magma rivers, exploding rock, slow-motion destruction. It hit me: that color. That movement. That energy. What if I could trap it in resin?
Conceptualizing a table that captures molten lava’s essence
Not just a swirl of red and orange — I wanted it to feel like the lava was still moving, like the table had its own pulse.

Gathering Materials: Building the Foundation
Selecting the right wood slab for a natural base
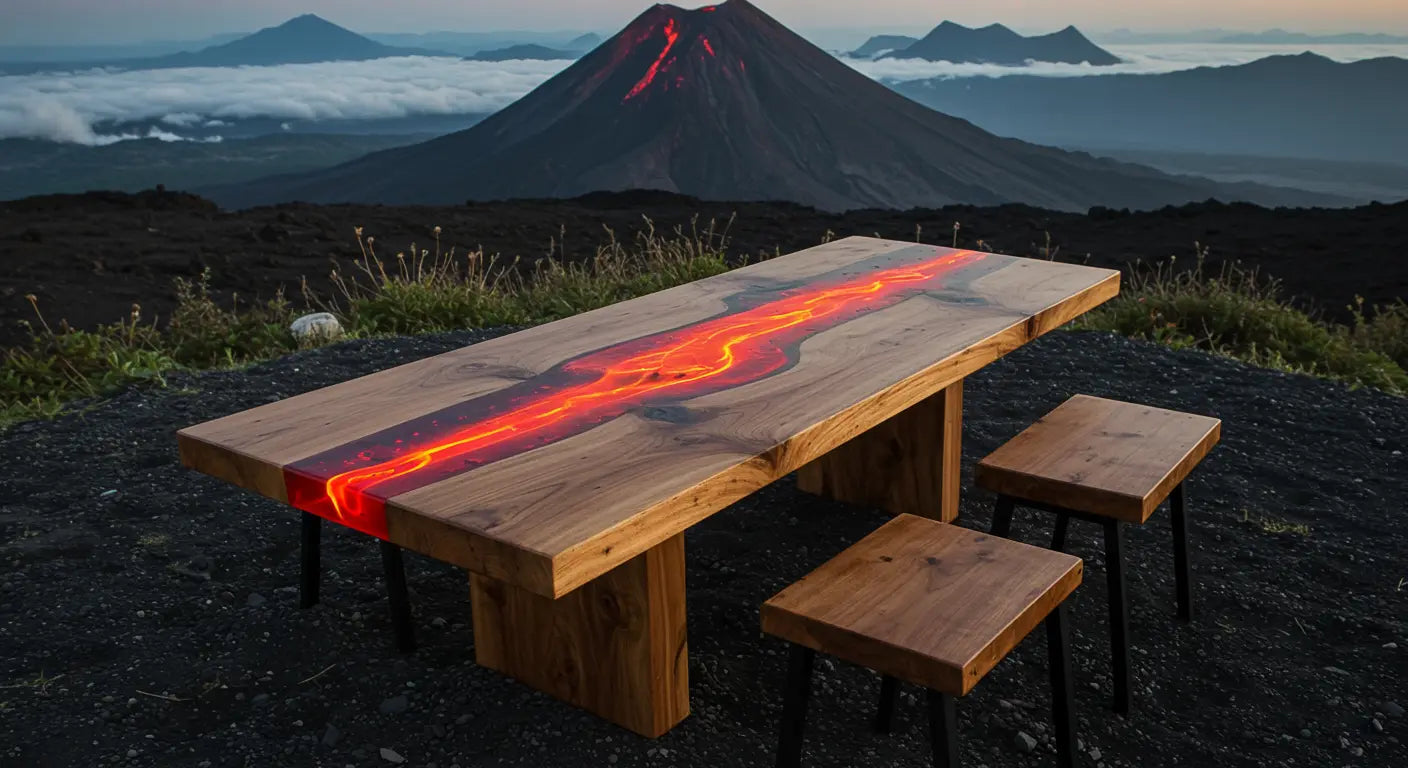
I went with black walnut — dark, dramatic, and full of character. Its natural grain gave the illusion of cooled rock around the lava.
Choosing epoxy resins and pigments to mimic lava flows
I used a clear deep-pour resin and mixed in layers of red, orange, yellow, and a touch of black mica. The glow came from color depth, not glow powder.
Tools and safety gear essential for the project
Gloves, respirator, heat gun, mixing tools — and patience. This pour wasn’t going to be forgiving.
Step 1: Preparing the Canvas
Cleaning and sanding the wood to perfection
I cleaned every knot, crack, and edge. Prepped like it was going into a gallery — because any flaw would show through once the resin hit.
Constructing a mold to contain the epoxy pour
Melamine box. Sheathing tape. Caulked seams. I triple-checked it — lava doesn’t care about your floor.
Step 2: Mixing the Molten Colors
Combining reds, oranges, and yellows for a fiery palette
I poured small test batches first. The red had to be deep, not neon. The orange had to glow, not fade. And the yellow? That was the highlight that gave it life.
Techniques to create depth and movement in the resin
I used swirl pours, directional dragging, and a few sneaky heat gun tricks to stretch and pull the colors into flow lines — just like molten rock.
Step 3: Pouring the Lava Flow
Layering the epoxy to simulate flowing magma
First pour: red and black base. Second pour: semi-transparent orange with metallic shimmer. Top layer: a high-gloss clear flood coat to make it look liquid.
Managing curing times to achieve desired effects
I let each layer partially cure before the next. That let me build layers of depth without it all turning into a muddy mess.
Step 4: Adding the Finishing Touches
Sanding and polishing for a glass-like finish
I sanded through the grits — 80 to 400 dry, 600 to 1500 wet. Then I hit it with a compound and buffed it to a mirror. That shine is what sold the lava resin table look.
Applying a protective topcoat to enhance durability
I used a satin urethane underneath and a glassy resin finish on top. UV-stable, scratch-resistant — this thing’s built to last.
Step 5: Assembling the Final Piece
Attaching sturdy legs that complement the design
I used matte black steel legs — minimal but bold. Anything more would’ve competed with the lava.
Ensuring stability and functionality of the table
Hidden brackets. Reinforced slab. This piece might look like a lava lamp resin table, but it’s solid. No wobble. No compromise.

Lessons Learned and Tips for Future Projects
Challenges faced during the process and how they were overcome
- I poured too fast once — got a heat spike. Let it cure, then sanded and saved it.
- I nearly overworked the swirl — next time, I’d stop earlier. Let the resin move naturally.
Advice for those looking to embark on similar creations
Don’t chase perfection. Lava’s not perfect. It’s powerful. Embrace the chaos. Control the edges, not the flow.
Showcasing the Fiery Masterpiece
Placing the table as a centerpiece in the living space
This volcano table ended up in a modern loft dining room. Bare concrete walls. Minimalist lighting. And then — BAM — lava.
Reactions and feedback from viewers and guests
People stop. They run their hands across the top. They ask if it’s hot. That’s how I know the piece worked. Thinking about making your own volcano epoxy table? Or want one custom-built from someone who’s already danced with the lava? Let’s talk


Share:
2 comments
I recently made a lava table and your lava looks amazing!!! It was a project that I tried multiple techniques, testing what worked best for me and the requested table before pouring the actual table. I know how difficult it is to make it look like real lava and your table is the best one I have seen yet.
I am getting a place where there is a volcano. Yours is by far a work of art and really looks like it is flowing. Is your workshop is in the US?